JM-01, a Cyberdeck in Two Versions
2026 · three.js · Raspberry Pi CM5 · LoRa · AR glasses · a concept, not built yet
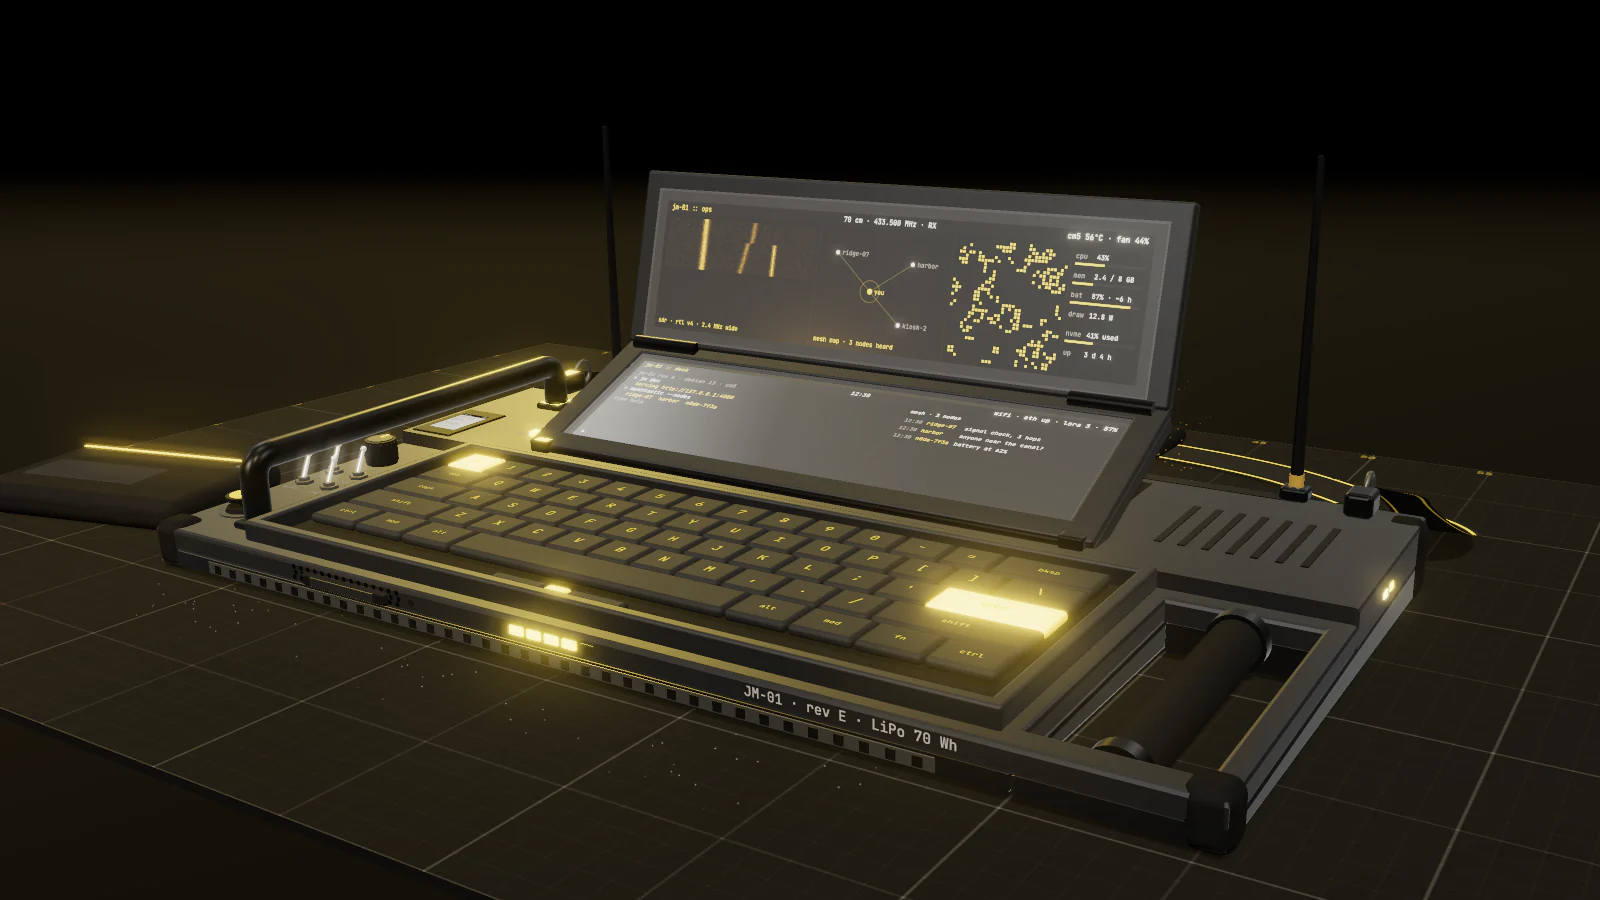
In cyberpunk novels a deck is the machine you jack into. Out here, a cyberdeck is a portable computer you build yourself, in a case you designed, with the radios and ports you actually want. JM-01 is mine. It doesn't exist yet: everything on this page is a model in the browser, sized from the real parts it would hold. The sizes are measured off that model, and the weight and battery life are estimates. It comes in two versions because I couldn't settle on the screen. One has two bar screens. The other has no screen at all and uses AR glasses.
Worn, not carried
The deck rides sideways across your back on a two-point sling, and swings round to your waist when you want to type, where a waist strap holds it level. Everything about its shape follows from that.
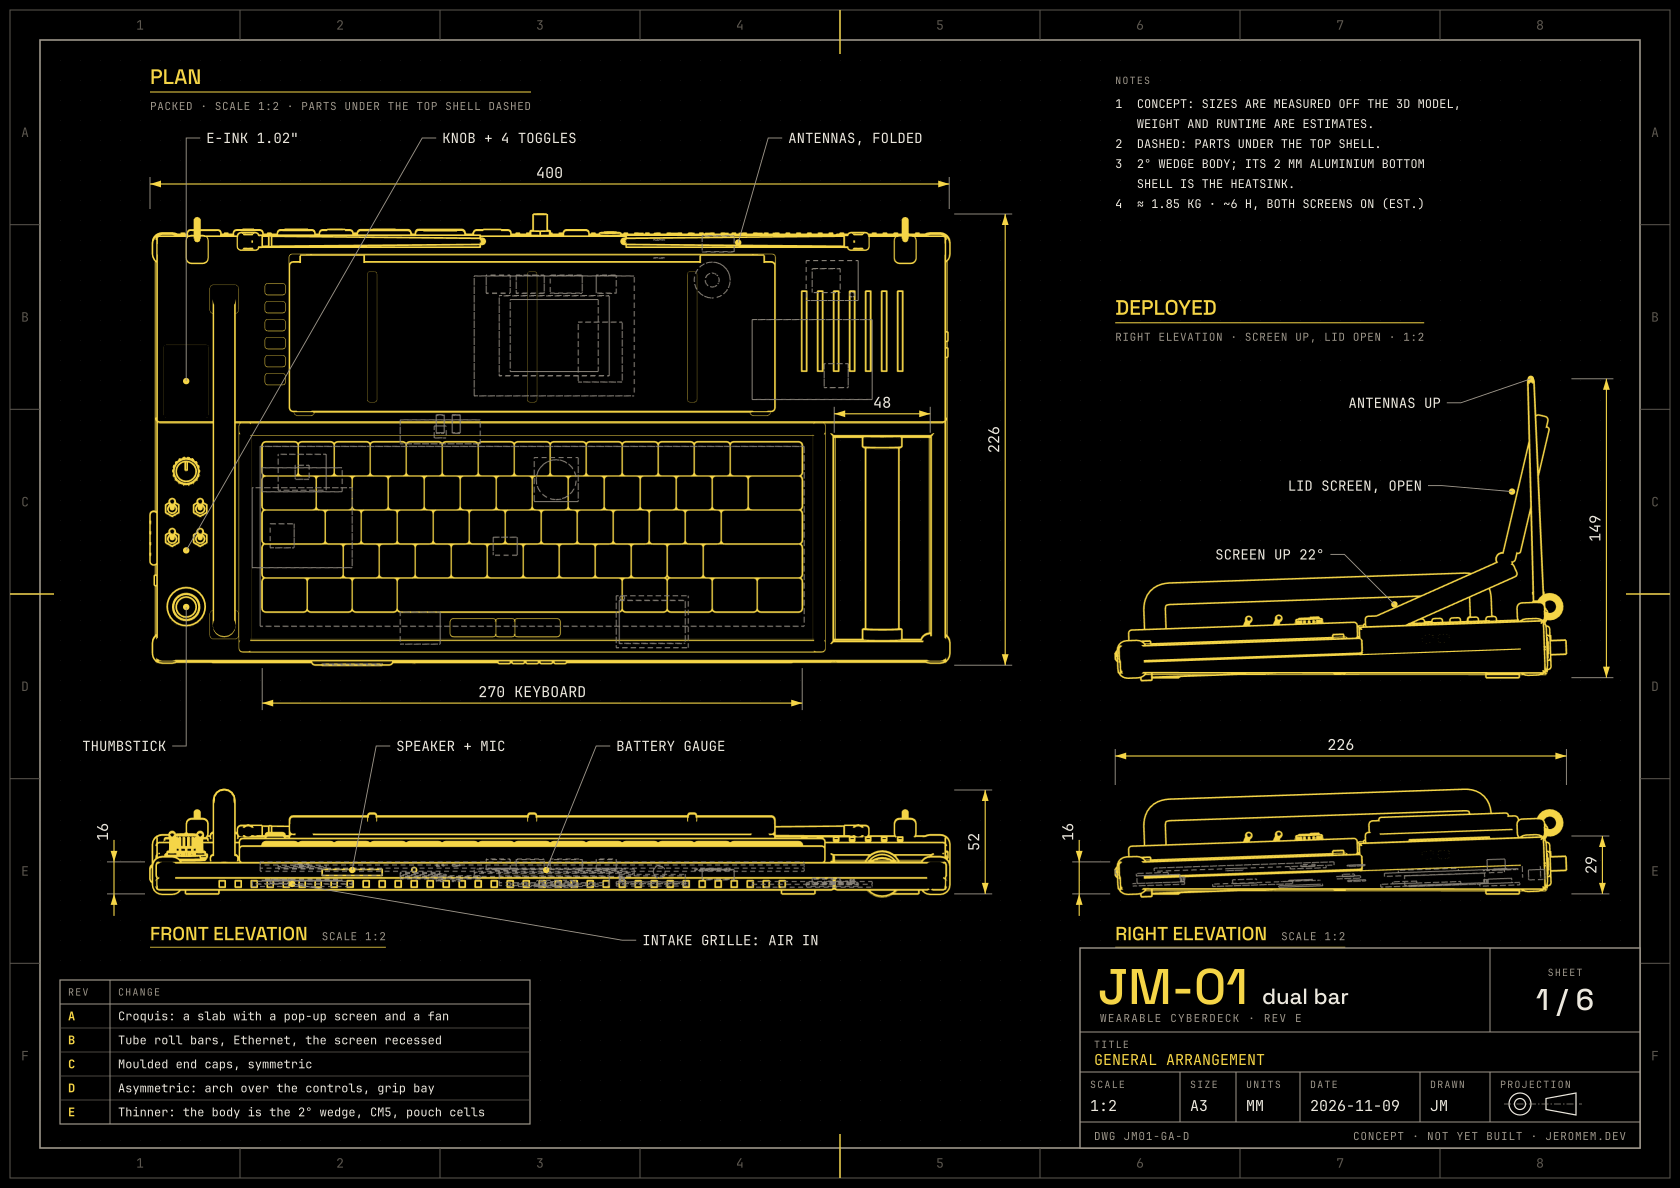
- The body is a wedge. Rev E, the current one, is a thin 2° wedge with a flat top. Its 2 mm aluminium bottom shell doubles as the heatsink: the Compute Module 5 sits face-down on it through a thermal pad.
- It's asymmetric. A bent tube arches over the controls on the left and doubles as a handle. On the right, an open bay holds a treaded rubber grip, so nothing sticks out of the case.
- The air goes out the back edge. Worn, the top faces your back, so it can't exhaust there. A 30 mm blower pulls air in under the front lip and pushes it out through the back. On your back the front edge points down and the back edge up, so it breathes like a chimney even with the fan off.
- Two whips fold along the back edge and swing up together for range, pointing up behind your head when worn. The right one is LoRa, the left one the 70 cm voice radio.
It got there in five revisions, each one sketched as a croquis first and only then modelled. Rev A was a slab with a pop-up screen. Rev B had tube roll bars and Ethernet, and Rev C moulded end caps. Rev D made it asymmetric, with the arch on the left and the grip bay on the right. Rev E thinned it down to the wedge, with flat pouch cells and a CM5 in place of 21700 cells and a Pi 5. Then the screen question split it in two.
The dual bar
The first version keeps a screen, and doubles it. The lower screen is an 8.8 in bar, 1920×480, set behind 3 mm of polycarbonate. It lies flush when packed and tilts up 22° on friction hinges when you sit down. The flip-up visor that used to cover it became a second bar: shut, it lies face to face with the lower screen, armoured back out; open, it stands above it like a laptop lid. The shell and the mesh messages stay on the lower screen, and the SDR waterfall, a mesh map and the system's vitals go up top.
I looked at a real foldable panel too: an 8.01 in OLED from a folding phone, 2480×1860, sold with an HDMI board. It lost on three counts: it's narrower than the bar, it needs a hinge I'd have to make, and its surface is soft. Two rigid bars on a plain hinge are cruder, but they're tougher. One thing is still open: the lid screen hangs off the CM5's spare MIPI DSI port, and I haven't confirmed that the CM5 can drive it, the lower screen and the back HDMI all at once. If it can't, the lid screen and the back HDMI share an output.
The AR version
The second version has no screen. A pair of AR glasses, the XREAL Air kind, puts a large virtual screen in front of you, and the deck becomes a keyboard with a computer in it. Without a screen to hold up, it loses the lid, the hinges and the whole raised band behind the keys.
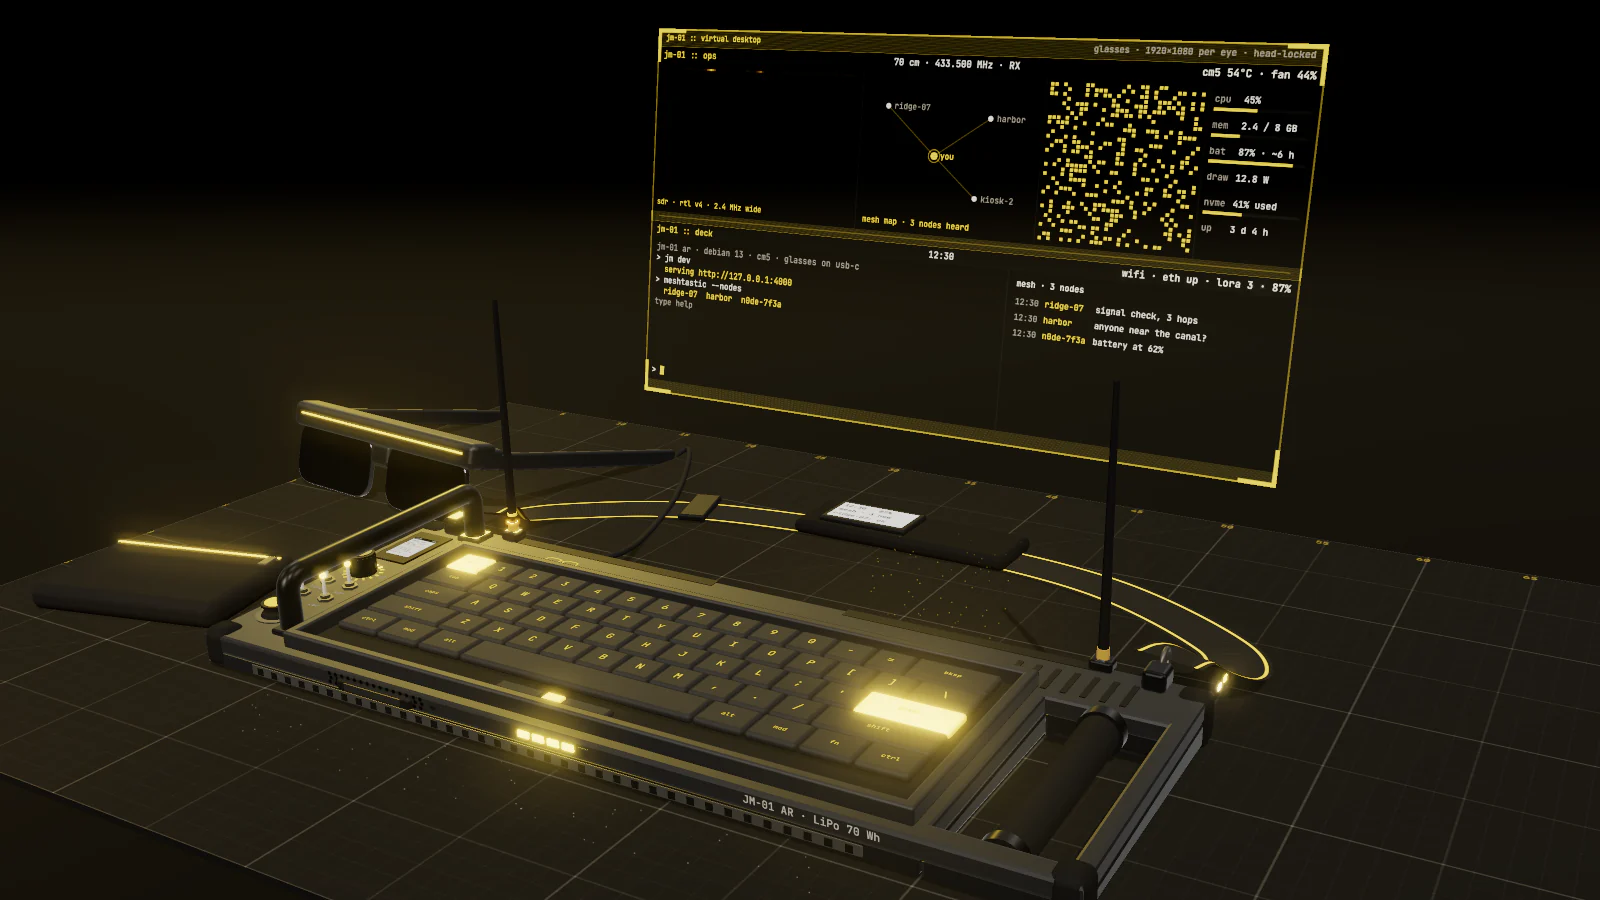
The catch is video. These glasses take DisplayPort over USB-C and draw their power from the same cable, and the CM5's USB-C has no video. Rather than hang a dongle off the back, an internal video bridge board turns the CM5's HDMI into DisplayPort and muxes it with USB and power onto one back USB-C, so the glasses' own cable plugs straight in. Head tracking would come from XRLinuxDriver, an open-source driver that runs on ARM64 but that I haven't seen tried on a CM5.
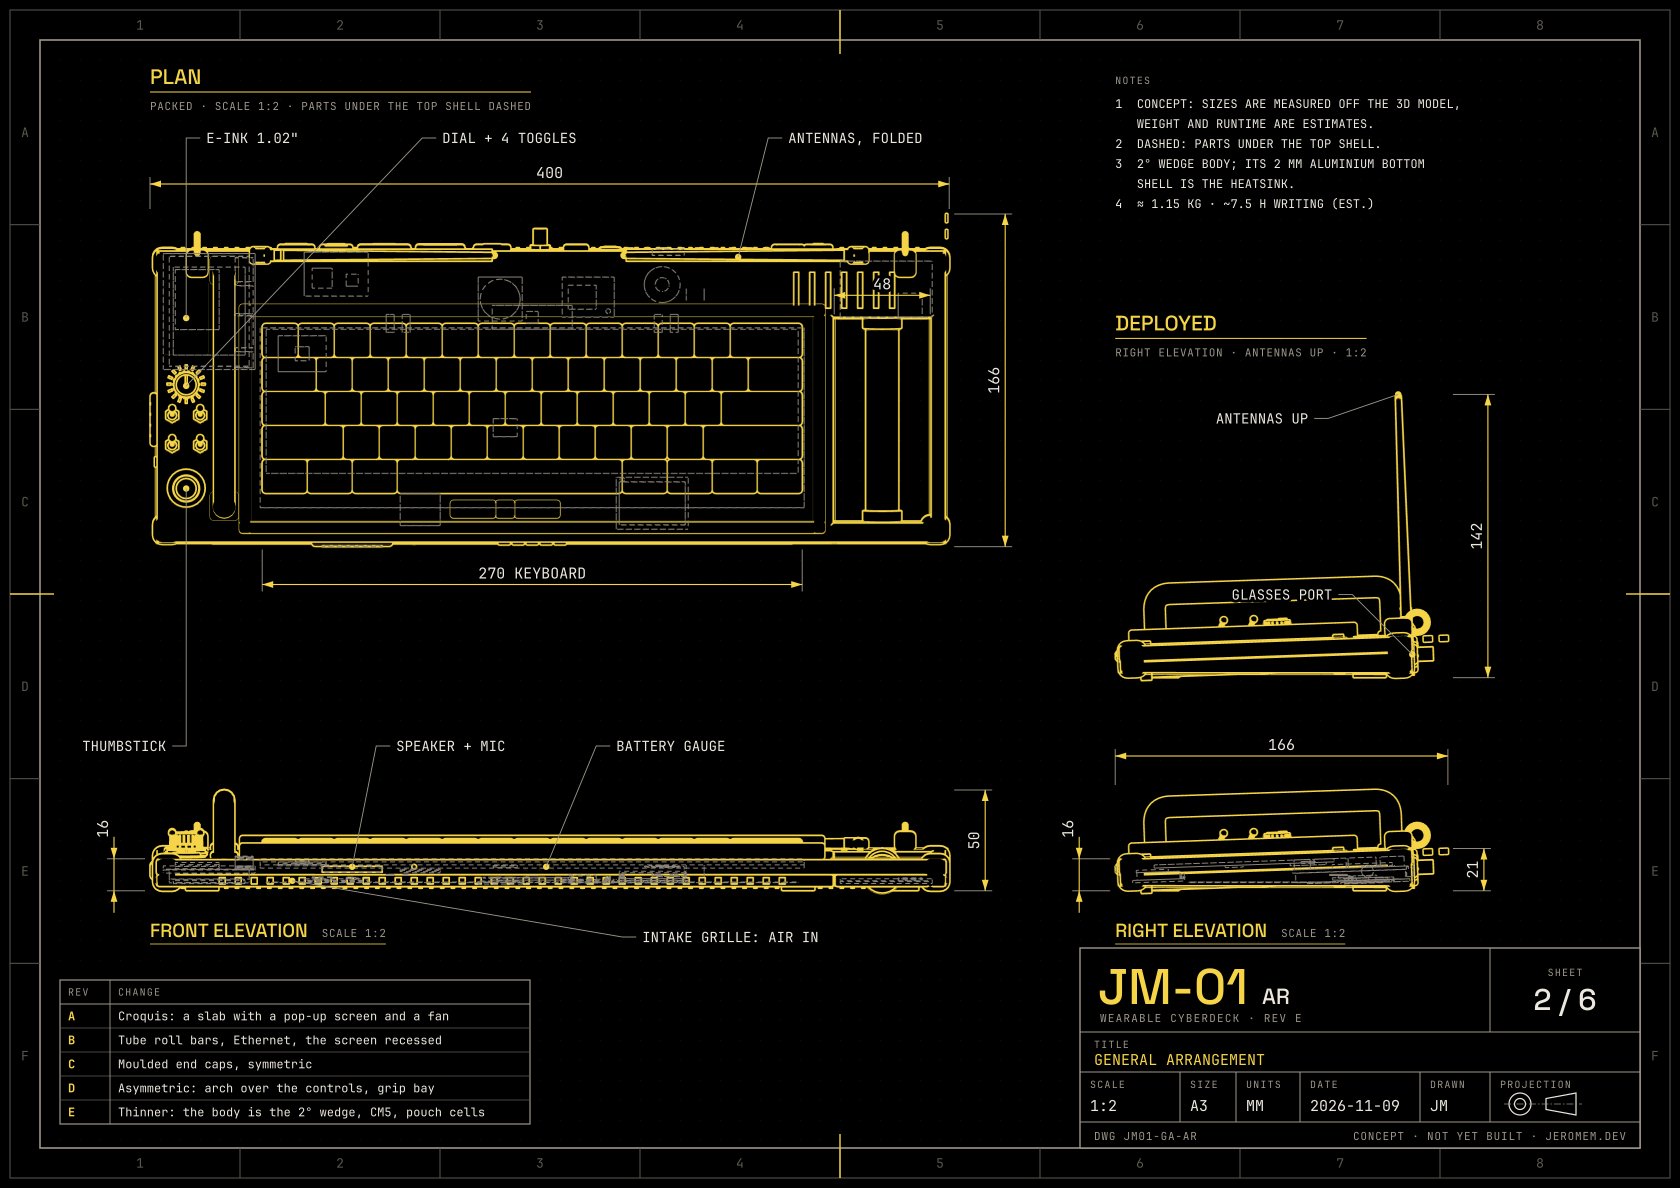
Losing the screen made room to rethink the depth, and it took three passes to go from 22.6 cm to 16.6:
- the status LEDs moved into the controls: each toggle's tip is its own light, and the dial has a 16-segment ring;
- the CM5 went under the left panel, behind the dial;
- the battery's two pouch cells lie side by side under the keyboard;
- the SDR, blower, LoRa, UPS and clock line up in one row beside the port jacks.
The 3.4 cm left behind the keys can't shrink much more: the Ethernet jack is about 2.1 cm deep, and the blower is 30 mm across. Going further would mean dropping one of them.
Side by side
Drawn over each other at the same scale, the difference is one band across the back: the screens, the lid and its hinges, and the space the CM5 and the battery used to take.
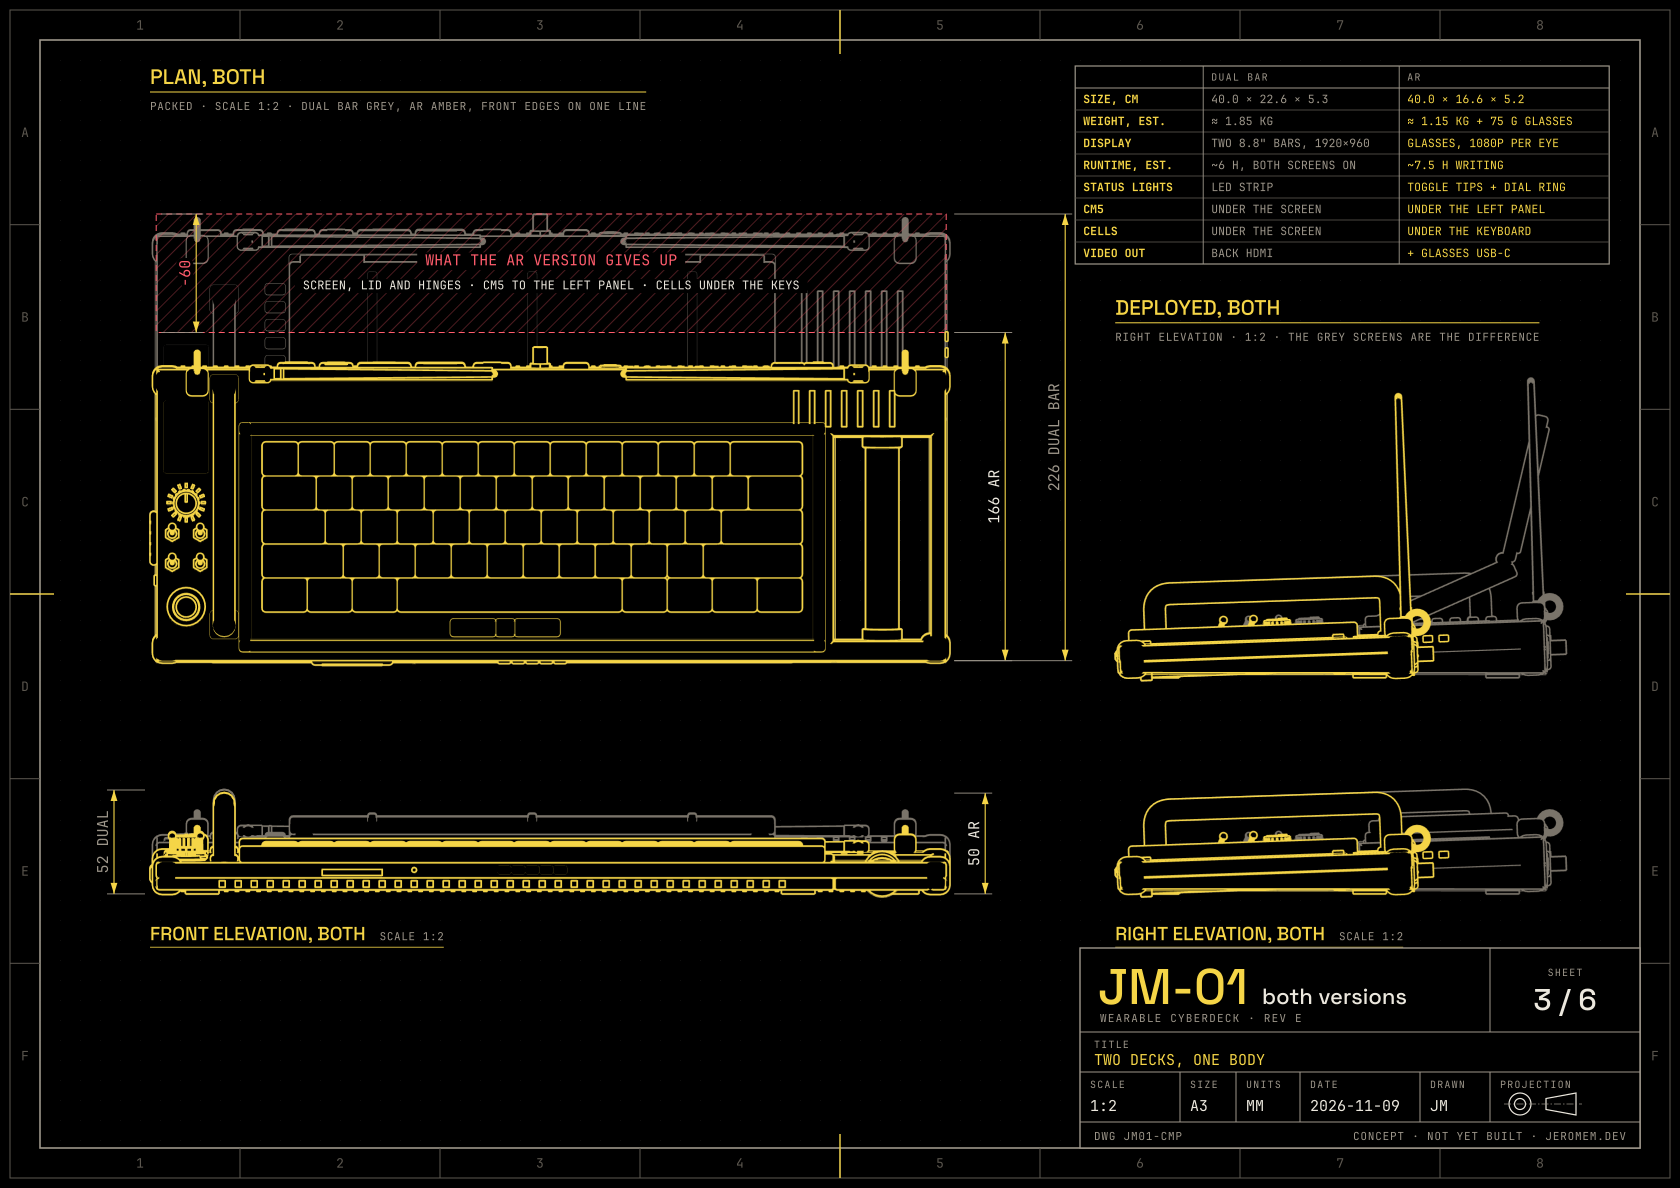
| Dual bar | AR | |
|---|---|---|
| Size, packed | 39.8 × 22.6 × 5.2 cm | 40.0 × 16.6 × 5.0 cm |
| Weight, estimated | ≈ 1.85 kg | ≈ 1.15 kg, plus ~75 g of glasses |
| Display | two 8.8 in bars, 1920×960 together | glasses, 1080p per eye |
| Writing, estimated | ~6 h with both screens on, ~7.5 h lid screen off | ~7.5 h with the glasses on |
| Status lights | an LED strip | the toggle tips and the dial's ring |
| Battery and CM5 | under the screen | under the keyboard and the left panel |
Both run on the same two LiPo pouch cells, about 70 Wh (63 usable), which keeps them under the 100 Wh limit for carry-on luggage. Either one lasts around 18 hours as a screen-off mesh node, also an estimate.
The radios
There are three, and only one of them needs a licence.
- LoRa is an SX1262 module running Meshtastic, a text mesh: messages hop from node to node with no network, no SIM and no account.
- The voice radio is an SA818, a 1 W module on the 70 cm band for push-to-talk voice and APRS. An amber PTT bar sits on the left end, with a red light while you're transmitting. Anyone may listen, but transmitting needs an amateur licence (in France, the ANFR exam). It only draws power, about 5 W, while you hold the PTT.
- The SDR is an RTL-SDR v4, receive only, on the SMA jack on the back. That's the waterfall on the lid screen.
Small things that matter
A thumbstick, not a pointing stick. The pointing stick between G and H became a sealed analog thumbstick at the front of the left panel. That's where your left thumb lands when you hold the deck by the arch. The keyboard's QMK controller reads it as a mouse, and the three click buttons stay under the space bar for your right thumb.
An e-ink panel, 1.02 in and 128 × 80, sits behind the dial. You can read it with the lid shut or the glasses off. It shows the time, the battery and the time left, unread mesh messages and the latest one, the voice channel, the IP address to SSH into, and which radios are on. It only redraws when something changes. When the deck is off it keeps a badge, with no power at all: the name, the battery, the last sync, and if found: jeromem.dev. A wider 2.13 in strip didn't fit: the AR version would have needed another centimetre of depth.
Every port has a rubber cap, every corner has a rubber block, and a neoprene sleeve with a window zips over the whole deck when it rains. That's cheaper than sealing the keyboard.
What's inside
Both versions share most of their insides. These sheets show them exploded, numbered against a parts list.
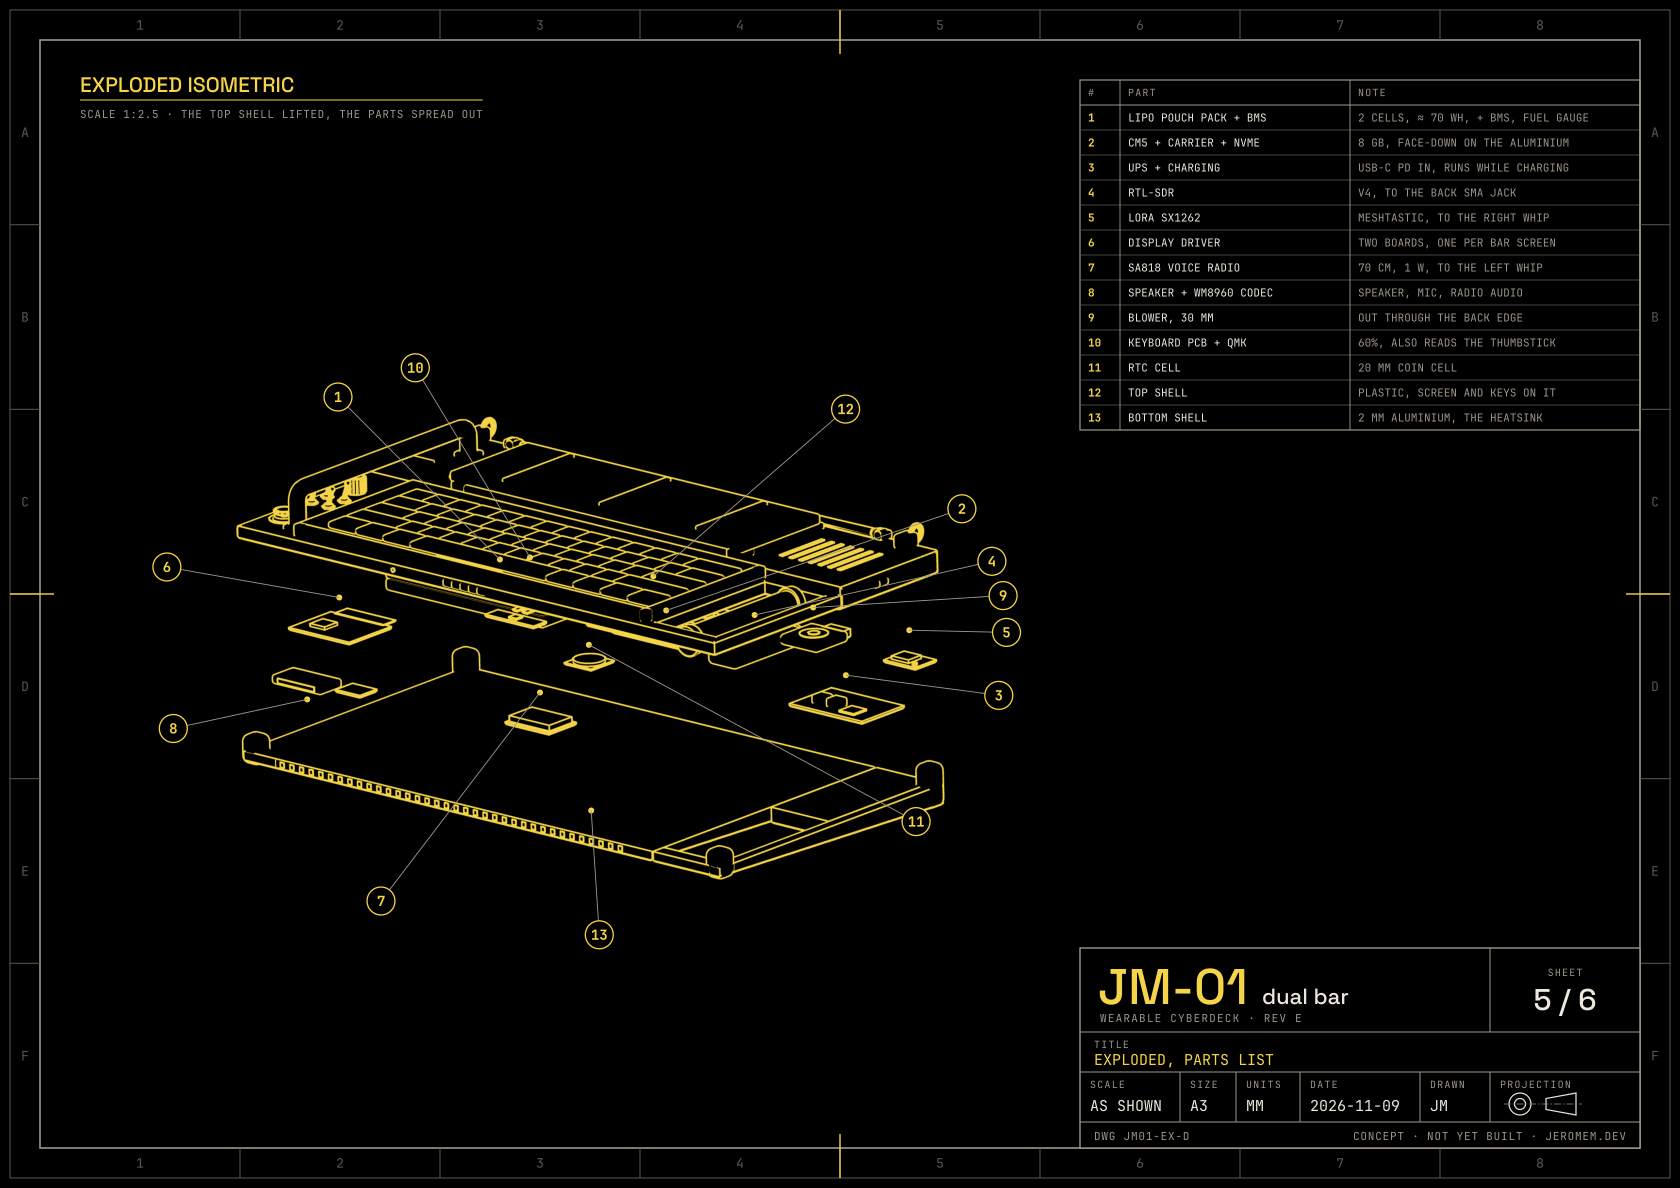
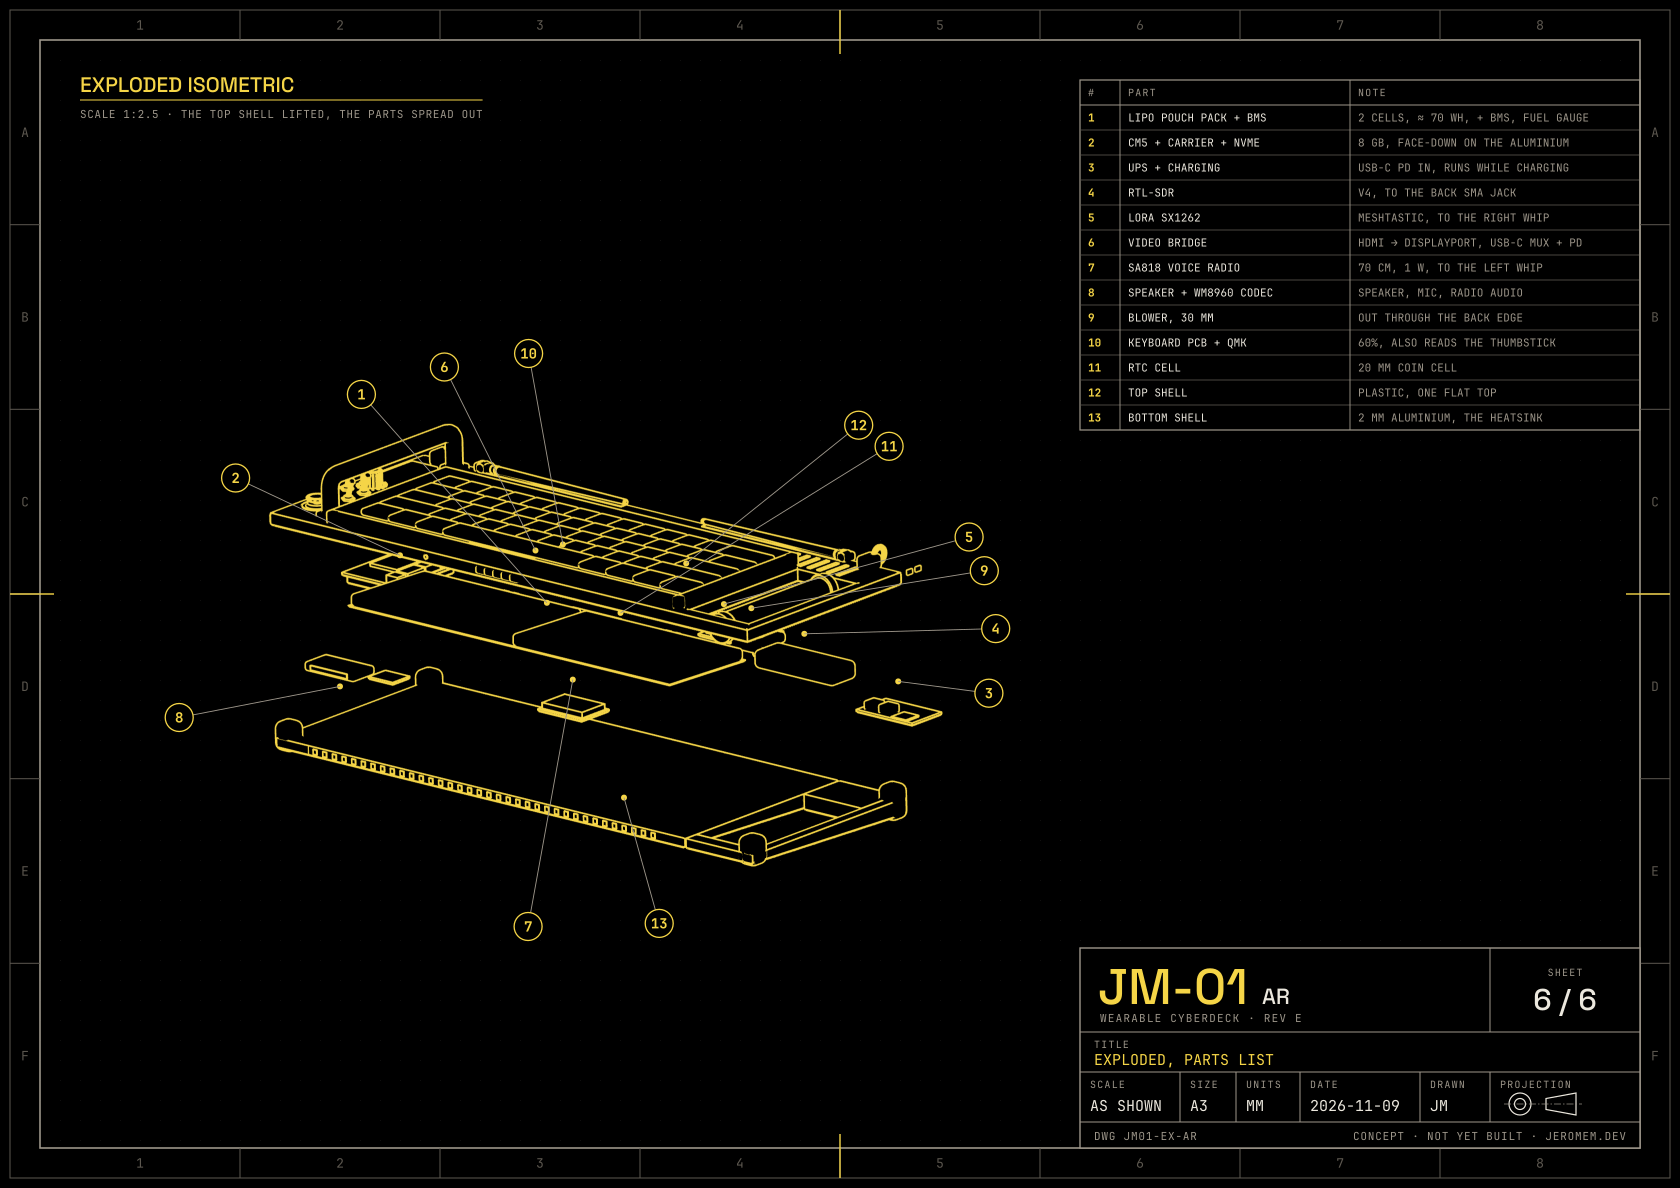
Everything hangs off the Compute Module. There's no USB hub: its two USB 3 ports go to the back sockets, and its two USB 2 ports to the keyboard and the SDR. LoRa and the e-ink panel share one SPI bus.
The two versions only differ in where the picture goes:
The back edges
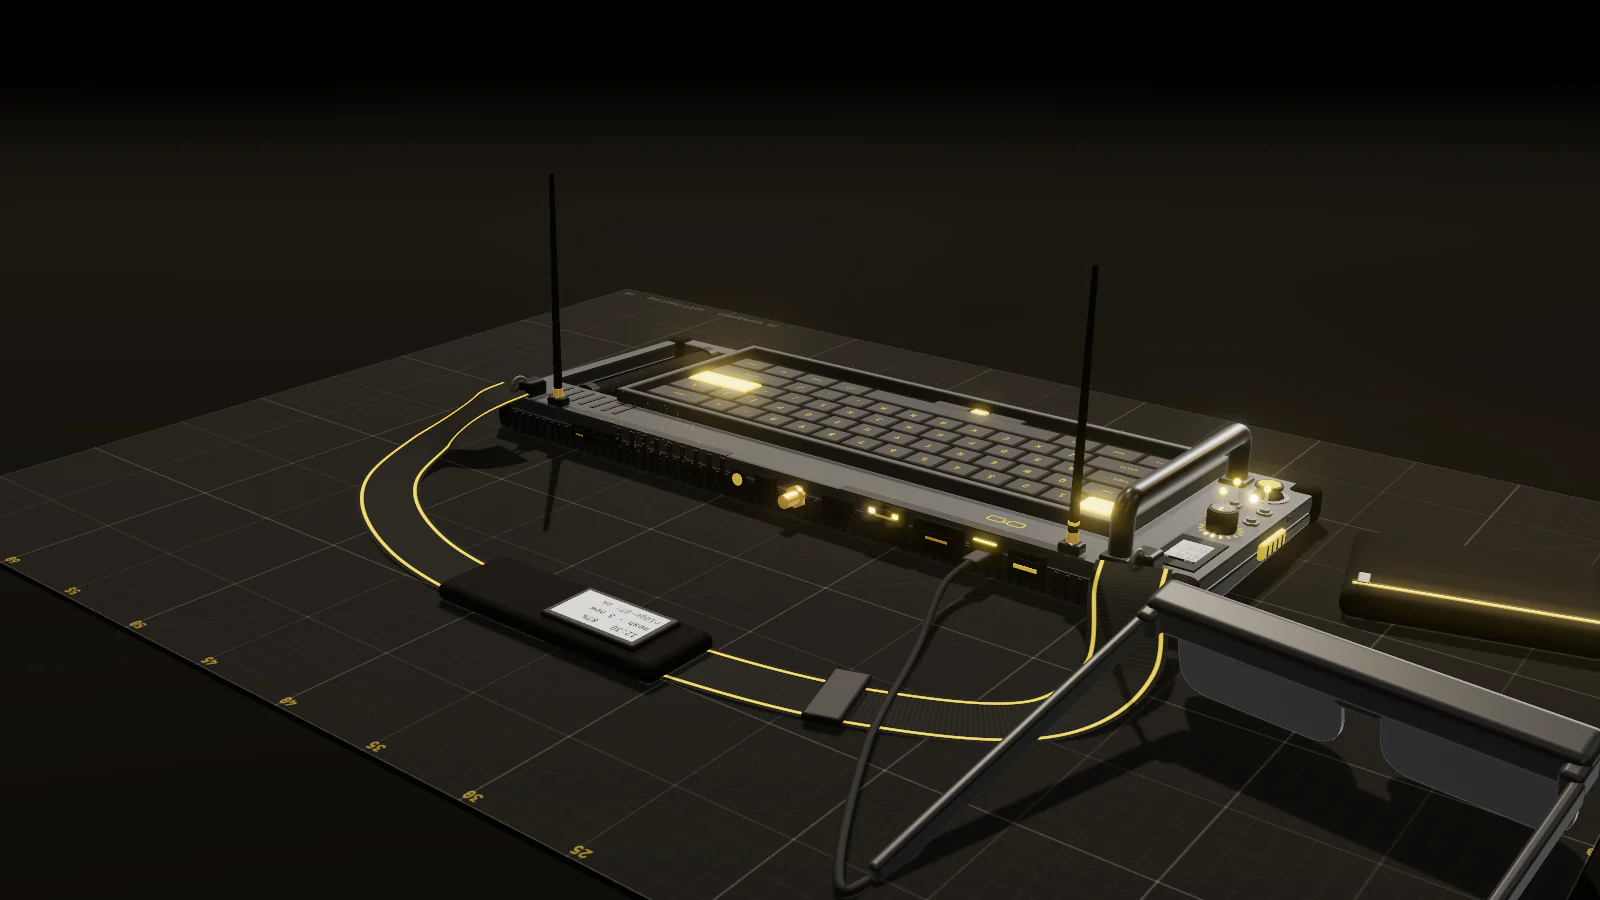
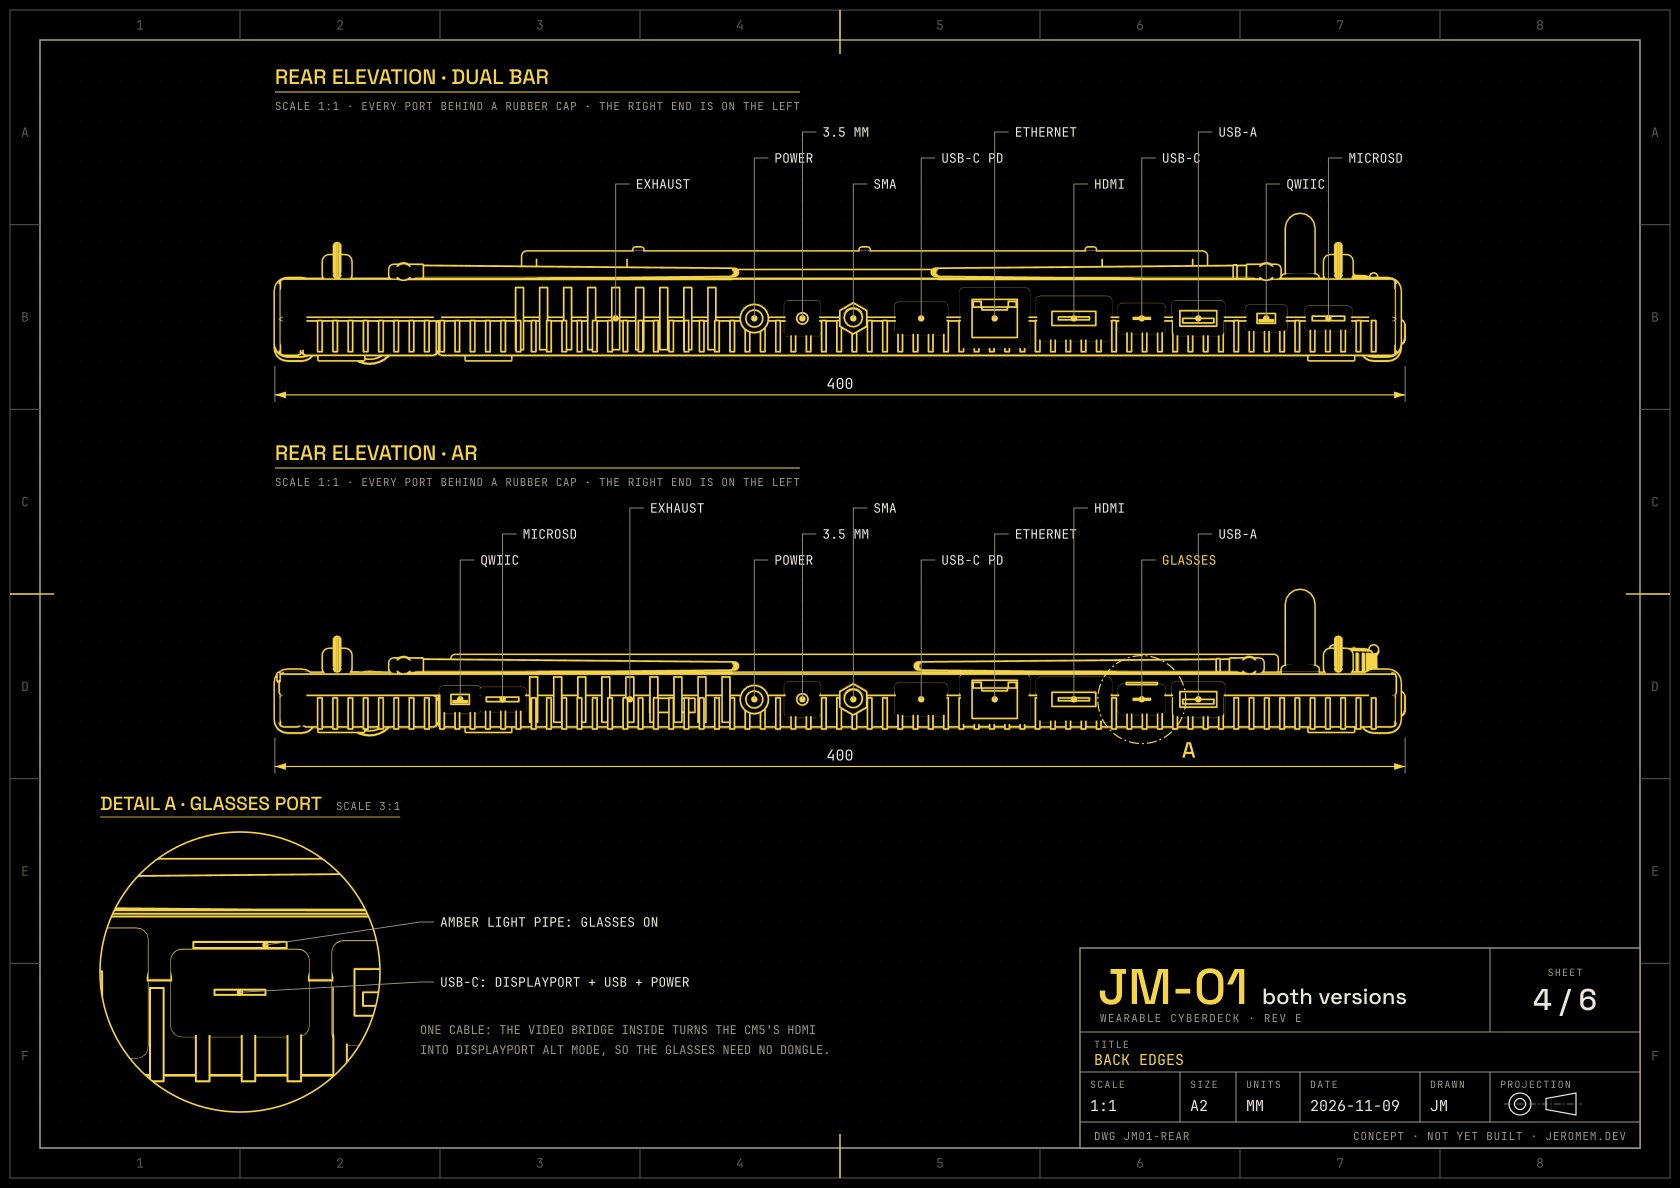
Both back edges at full size. The AR version's USB-C is the glasses port, with an amber light pipe that's lit while they're plugged in.
How the drawings are made
The sheets come from the same three.js models as the two you can turn above, so they can't drift from them. Each view is an orthographic camera at true scale: 1:2 on an A3 sheet is 20 units to the centimetre. At that scale the plan, the front and the right elevation line up in third-angle projection, and the dimensions are measured off the model itself. The line renderer draws every part in black first, so it hides whatever is behind it. On top of that it draws every hard edge in amber, plus outlines for the curved parts, made by pushing their back faces out along the normals. The parts under the shell are drawn a second time, only where the depth test fails, in dashed grey: the X-ray in the plans. The text is set in this site's own typefaces and turned into outlines, so each sheet is a single SVG that needs no fonts. Click one to open it full size.
What's next
Building it. I'll start with the parts that could change the design: whether the CM5 can drive three displays at once, whether XRLinuxDriver runs on it, and how warm the aluminium gets under a long compile. Real use will decide between the two versions, or what v2 becomes.
Back to Experiments · play in the Labs · see how this site works.